Thursday, June 11, 2009

Pinstriping Done!

Well, after finding a particular dearth of pinstripers in the Carrboro-Chapel Hill Metroplex, I resigned myself to getting the pinstriping done on my own. I headed to Michael's, and found, to my delite, a gold paint pen with an extra fine tip.


This was good, because my intention was to keep the striping quite subtle on this bike, simply highlighting the steel lugs on the frame with a fine gold line.

I tried my hand first around the bottom bracket, being sure to keep the frame as stable as possible, and giving myself plenty of time. I needed to get used to the flow of the pen on the frame, and after practising on paper for about half an hour, I decided I was ready.

The result surpassed my expectations, actually. The flow was even and perfect, and the lugs provided an outstanding contour upon which to rest the pen tip. Next, I moved on to the seat stay lugs. After a succesful attempt there as well, I finally moved to the more ornate head tube.


Not bad for my very first pinstriping job, even if I am saying so myself. I'm satisfied with it anyway, and it's my bike, so there. (^_-)

Next thing to accomplish will be getting the wheels built. I'll look into making that happen next month. I also just found a source for inexpensive French-thread sealed-cartridge bottom brackets! WOO-HOO! Stay tuned!

Wednesday, June 3, 2009

Frame is BACK!

This evening after work, I drove down to Pittsboro to see Jerry Campora, and pick up my frame and forks. The evening was turning a lovely dusky grey, and the weather was FINALLY starting to cool off to a manageable temperature. (Alas, the Jeep, however, was overheating. I had to stop twice on the way down, and five times on the way back to let the engine cool off.)

Jerry was happy to show me the work he'd done, and for good reason. It is remarkable. The finish is even and smooth, like a glass surface. The color is dead uniform all over. (We heart powdercoating!) Jerry says the finish is three mils thick, which should provide a lifetime of protection and toughness to the steel underneath.


The finish around the lugs is quite nice, leaving the detail of the lugs visible, while simultaneously providing protection on all surfaces of the lugs themselves.


The next step will be to outline all the lugs with gold pinstriping. However, I'm having a hard time finding a pintsriper in the Chapel Hill area. Anyone know of one? If I don't find one nearby, I may be forced to learn how to do this myself.


Once the pinstriping is done, next will be lettering. I am in NO way comfortable doing that myself, so I will take my time, and find someone in the area who really knows what they're doing.

This brings up an interesting quandary for me. Originally, I had planned to get factory decals from ebay for the bike. But since I have basically discarded that idea in favor of a more retro look, I am left with coming up with an earlier Peugeot design, or ditching the Peugeot name, and coming up with a completely original Marque/Name for the bike.

In one direction, I get "Peugeot" lettered on the downtube of the frame in the original script of 1940's French Peugeots.


I also find and add a really old, retro Peugeot head badge, like this:


Or this:

In the other direction, I abandon the Peugeot logos and badges all together, instead giving it a name and identity all its own. For instance, I could call it a Renard Ruse', french for 'Sly Fox', or maybe Renard Ruse' ReCyclerie, or some derivation, and have a local artisan / jewelery maker create a custom headbadge just for me and this bike. (Like a beaten-copper silhouette of a Fox, perhaps?)

All that has yet to be decided. At the moment, my focus is on the next steps: Pinstriping, and the construction of the wheels. I will also be using the frame and forks to get measurements, thus allowing me to finalize the list of parts I need to purchase to make the bike ridable.

Many, MANY thanks to Jerry Campora. He's in the process of building a website right now, and I will link to his as soon as he's up and running. I recommend him to anyone considering custom powdercoating. He was a pleasure to work with, and made the entire process painless and rewarding.

I got my frame back! WOO-HOOOOO!!!! (^_^)

Tuesday, June 2, 2009

Trying to decide...

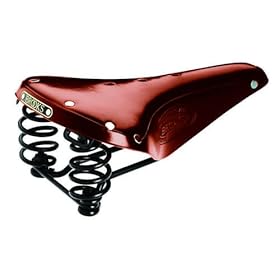
I'm trying to decide on a seat. I know I want a leather saddle, one that will break in to fit me perfectly. Brooks is pretty much the only way to go. The question is, which one? I've narrowed it down to three choices:

First: The Brooks Flyer. Simple, single-rail, 2-spring design, smooth saddle surface.

Second, the Brooks B135. Double-springs in the back, a push-pull arrangement, double-rail, with looped spring in the front. Textured saddle surface.

Third, the Brooks B33. Twisted, all-chrome springs, triple-rail, loop springs at the front. Textured saddle surface.

Any of these three saddles fit in with the Porteur style I'm going for. They're made for riding upright, and to soak up heavy hits and rough surfaces. They'll add just the right vintage look, while breaking in to be a perfect saddle to fit me and my riding style.

So many decisions!

Friday, May 29, 2009

And so it begins in earnest...

On Memorial Day, I met Jerry Campora. Jerry is semi-retired, lives in the Pittsboro area, and is the one name on everyone's lips when I ask about refinishing a bicycle frame.

Jerry came down a few years ago from the Northeast, where he was a crane operator. On the side, he was learning how to media blast and powdercoat, two things he wanted to learn so he could work on hot rods, one of his hobbies.

Richard's Red Raleigh was done by Jerry, and the results were pretty spectacular. Several of the fellas at the Clean Machine and the Bicycle Chain had previously had bike parts blasted and powdercoated by Jerry, and all had good things to say.

I met Jerry in the morning, on a beautiful day. He came out and shook my hand, and we looked at my frame and forks. Jerry said they were in pretty good shape, and would need no bodywork. He took me through his shop, showed me examples of his work. The shop was spotless. The equipment was clean and ready to use. His examples? He pulled a fork down off the wall.

"This is just an old trash fork I powdercoated," he explained.

It looked better than new. Folks, there are brand new bikes sitting on showroom floors that didn't look as good as the finish on that fork. It was french blue, with a high shine. The lugged fork crown was in stark relief; not too thick, not too thin. Just perfect. I was sold on Jerry's skills.

We dug out the color samples, and looked through them. I had decided, after seeing a particularly nice Rene Herse porteur online, that I was going to go as classic as possible, without going black. I went with a medium, non-metallic gloss grey. It's close to what you might call a 'flannel grey'. I also asked him to grind off the old cable guides, as I would not be needing them on a single speed bike.


(A Rene Herse Porteur from the mid-1950's. Classic.)

Jerry assured me he could give me an excellent finish on the frame and fork, and that all the un-coated areas would be kept pristine. We shook hands, and I left my baby in his capable hands.

The price was reasonable, and within my budget. I'm quite glad, because for the level of work Jerry was showing me, I had expected to pay a bit more. This will likely be the most expensive single part of my rebuild, and I want it done right.

Jerry called the next day to say the powder was ordered, and everything was on schedule. He was beginning prep work. I like Jerry, he answers calls and asks questions. If he says something is so, it will be so. That's how business should be done.

When he was prepping the frame, and preparing to grind off the old cable guides, Jerry noticed that the guides had been welded in such a way that grinding them off might grind into the frame. Instead of taking a chance, he called me, and recommended leaving them in place and coating them. I agreed.

The finished powdercoating should be back in my hands next week! I am a bit excited about this. I have moved out of the deconstruction, and into the re-construction! This makes me happy.

Future plans for the frame and forks include having the lugs all relief-pinstriped, and having old-style 1940's script logos painted on in the proper locations. Photos will be in the offing.

*does the happy-snoopy dance*

Save Our Parts! (They may be important!)

Ah, the joys of restoring a machine not made in this country.

So the French have a particular way of doing... well, just about everything. In the case of bikes, they have, until recently, been of a mind to do things their own way, and not anyone else's. What this means is that French bikes are notoriously difficult to get parts for.

Example: Most all the world makes their bottom brackets such that the right retaining cup screws and un-screws in the standard fasion (lefty loosey righty tighty) while the left retaining cup is reverse threaded. The reason for doing this is that the forward motion of the left crank has a tendency to loosen the left cup were it threaded the normal way. It's a simple solution to the problem.

The French couldn't be buggered to do that. They just made both retaining cups standard threading, and then tightened them down really tightly.

To be fair, if you use a bit of loc-tite, this is usually never a problem. However, since old French bikes used loose-bearing bottom brackets, instead of the modern sealed bearing brackets... it made them notoriously tetchy to work on, and no one made a viable replacement.

Until a few years back, when Phil Wood & Co. began making sealed hubs with available French-Threaded retaining cups. Now, let me just say, up front: Phil makes a freaking fantastic product. Basically, everything in their catalog is top-quality, outstanding manufacture, fit and finish. No one is better. Period. Now, that being said, they are freaking expensive compared with most other parts manufacturers. I will be getting a bottom bracket and cups from Phil Wood, but even with a discount, they will NOT be cheap.

Other French foibles include, apparently, the stem size. Most bikes which use a quill-type stem (like the Nitto Technomic I'm getting) use a standard 1-inch diameter fork steering tube. The French? Oh, they don't believe in inches, apparently. Older French steering tubes are just a tiny bit smaller. Less than 1/16th of an inch, but enough to keep the standard quill from inserting. And the REALLY old French designs used a different threading on their steering tubes, meaning one has to buy a French-specific headset.

Keep in mind, I threw my original stem, headset and bottom bracket bits away. They were shot.

I don't yet know if my fork steering tube is this foible-icious or not. I know the headset threading is standard, however, so I have hope that a standard quill will also fit. The changeover for these parts happened much earlier in time than the fix for the bottom-bracket issue. I'll check the fit when I get the forks back. More on that in a future post.

On an up note, I got the parts I'm saving and re-using cleaned last evening. The kind folks at The Clean Machine (the shop I once worked at) let me use their parts washer for an hour, with the really wickedly unhealthy degreasing/cleaning solution. (But man-oh-man the stuff works.) My parts are now pretty and prepped and ready for re-installation when the time comes. Chainrings, chainring guard, cranks, brakes and sundry small parts have been dipped and scrubbed clean, and await re-installation.


*Red grins* MMmmmm... shiiiiny. (^_^)

Thursday, May 28, 2009

Picking Parts


(Above: Gentleman's Bike from Velo Orange)


So, now I had a direction, but what to actually DO was a daunting list. I needed to decide what parts I would want to use to achieve the look I had in mind, and also decide on a color scheme.

Fortunately, working for a chain of bike shops has many advantages here. I have a load of catalogs to look through, and easy access to special ordering. Even still, I ended up finding a lot of things I wanted online. The internet has been a source of not just inspiration, but fulfillment of those ideas in the form of bits.

I need a new stem, bars, cables, brake levers, hubs, rims, chain, freewheel, seatpost, seat, fenders... anything I can't get through the store, I find on one of my favorite classic bike parts dealers' websites. I've linked several of my favorite spots on the right-hand column.

I have to say, I plan on purchasing a number of hard-to-find parts from Velo Orange. No one else has taken the time and effort to create bars and racks and fenders, or source hard-to-find inverse levers, or round up lighting systems and accompanying hardware quite like the folks there in Annapolis.

Harris Cyclery will likely be supplying my hubs, and perhaps a few other small bits and bobs. Rims, stem, chain, seat and seatpost I'll be getting through Clean Machine, along with cables and cable housings for my brakes, and brake pads.

I found a lot of fenders out there, and have yet to decide between a classic alloy, or the sweet, warm novelty of steam-bent wood!

Then the big question of finish: what color to pick? Initially I wanted red... and then I met Richard, a local tattoo artist who rolls on a simply gorgeous Raleigh 3-speed with rod brakes... in a delicious fire engine red. If you've seen Richard rolling down Rosemary Street, you know what I'm talking about. Yes, the bike with the built-in bottle-opener on the seat downtube. I decided red was a bit too... easy for this build. I wanted something classy, but also... different. How about green? Blue? Black? None of them seemed right.

Then I got a look at an original Peugeot Porteur from the 1950's, still in its original paint... and it hit me.

It's ALL about the subtleties. You'll see.

Inspiration!

One of the most difficult parts of this project has been the direction I want to take it in. You see, the direction has changed several times throughout the course of the project.

Initially, I was interested in a restoration to basically stock, but switching to fixed gear. Then it was a full-custom track-style fixie. I worked in a bike shop, it was all the rage... and the bikes just looked so darned cool, man.

However, as I thought more about it, I realized... this type of bike didn't fit my riding style. The older I get, the less interested I am in going fast, you see. I don't want to lean forward on my bike anymore... I want to sit more upright. I want to take lazy jaunts down country lanes in the crisp autumn air. I want to take a picnic basket along with me, and maybe a small thermos of fine ginger ale.

I started looking further into the past for inspiration, back to a time when gentlemen riders pedalled slowly, to work and back, or down a country lane on a weekend day, unhurriedly in search of what was around the next bend. A time when racing wasn't the raison d'etre of cycling... quite the opposite.

I found an interesting article about a type of bicycle long forgotten by most modern people: The Porteur.
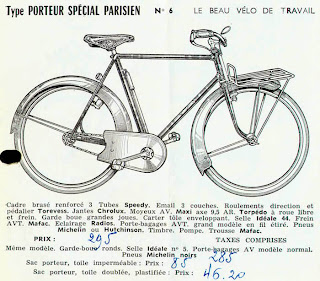


Porteur bikes are bikes built to carry loads, in the most basic sense. The classic Porteur bike has a large front rack, fenders (mudguards) providing full coverage of the wheels, a low-mounted seat, and handlebars mounted to allow the rider a more upright position.

This style of bike was wildly popular for french companies like Peugeot, who had a Porteur in their lineup from the 1920's up through the 1950's.
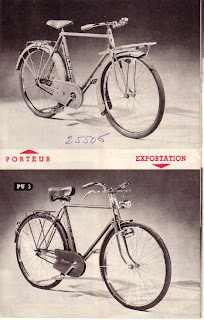
Every major bicycle manufacturer on the European Continent had a bike for this segment. They were work bikes, designed to carry loads, and were wildly popular in the narrow streets of European towns. Bakers, butchers, tinkers, salesmen, paperboys, policemen, postmen.... they all used the porteur. In Paris, there was a famous rivalry among the newspaper delivery porteurs. Each vied to get their paper to the news stands first. So intense was the rivalry that, starting in the late 1920's, an official Porteur Race was held yearly in the streets of Paris!
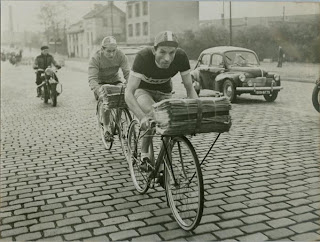


Here was inspiration! A bike meant for riding everyday, with a heavy sprung seat, upright riding position, full fenders, and a proud, classic tradition. If I could make a good imitation of this style, simplifying along the way when possible, I could end up with a beautiful bike which was both comfortable and practical.

I found a number of similarities with the City Bike, a catch-all term used to refer to a (usually) 3-speed gentleman's bike for riding about town.

This bike was constructed at Velo Orange. It is based on City Bikes and Porteur Bikes, with a distinctly French flair. This was a direction I could get behind. Elegance, practicality... I now had my vision.

No racing for Red. I want a mode of transport. I want an everyday conveyance... with style.